Samples
The [Samples] section includes the SampleName, Index1, Index2, Project, Lane, and ExternalID columns. When the Samples section is populated, only SampleName is required. When it is unpopulated, Bases2Fastq defaults to an entry that specifies one unindexed sample for each lane.
Columns
| Column | Constraints | Definition | Allowed Values |
|---|---|---|---|
SampleName | Required | The unique name of each library in the run. | 1–64 case-sensitive alphanumeric characters, hyphens (-), and underscores (_) |
Index1, Index2 | Optional | The Index 1 and Index 2 sequences that correspond to each library. Each sequence consists of A, C, G, and T, with a plus sign that separates multiple sequences. | Each sequence consists of A, C, G, and T, with a plus sign that separates multiple sequences |
Lane | Optional | The number of lanes to restrict a library to. If you use individually addressable lanes add-on with two library pools, then lane 1 refers to the Library well and lane 2 refers to the AUX well. | 1, 2, or 1+2 (default) |
Project | Optional | The name of a project to group samples together. To successfully group samples together, project names for samples must match exactly. Make sure that no sample is assigned to more than one project. Bases2Fastq assigns any samples that are missing a project to a default project named DefaultProject. | 1–64 case-sensitive alphanumeric characters, hyphens (-), and underscores (_) |
ExternalID | Optional | Each identifier can include 1–64 alphanumeric characters, hyphens, and underscores. | 1–64 case-sensitive alphanumeric characters, hyphens (-), and underscores (_) |
Recording Index Sequences
The index sequences recorded for an experimental library are based on the library prep workflow and --force-index-orientation argument in Bases2Fastq. When this argument is used, Bases2Fastq uses the orientation that is recorded in the run manifest. By default, Bases2Fastq detects and uses the correct index sequence orientation regardless of the orientation that is recorded in the run manifest. The maximum number of cycles in an index that can be used for demultiplexing is 16.
Sample to Index Mapping
A repeated sample name links the specified index sequences to each other, so you must consistently capitalize sample names. Single or dual indexes can be specified as follows:
- If you specify multiple indexes for
Index 1andIndex 2in the same row, then Bases2Fastq uses all possible pairwise combinations. - In the
SampleNamecolumn, enter the name of each library in the run. - In the
Index1andIndex2columns, enter the index sequences for each library in the same orientation.- For unindexed libraries, leave the
Index1andIndex2columns blank. - For single-indexed libraries, leave the
Index2column blank.
- For unindexed libraries, leave the
Index Orientation
When you record sequences in the Index1 and Index2 columns, use the same orientation for each sequence in a column. If you enter wrong sequences or mix orientations, then the index assignment is affected.
- For the Adept™ Workflow, enter the third-party index sequences.
- If orientation detection is enabled in Bases2Fastq, then enter the third-party index sequences as found in documentation.
- If orientation detection is disabled in Bases2Fastq, then enter the third-party index sequences in the correct orientation. For more information, see Read Orientation.
Index Sequence Selection
- For the Elevate™ workflow, enter the Elevate Cloudbreak™ index sequences.
- If a run includes a PhiX spike-in, then enter the applicable sample names and index sequences listed in PhiX Control Library index sequences. Each PhiX Control library includes four index pairs with defined names and sequences.
Index Collision
The Index 1 and Index 2 Mismatch Threshold settings allow users to adjust the number of mismatched bases between the observed index read and the expected index sequence that Bases2Fastq tolerates. When index sequences within a column are too similar, an index collision error occurs.
The following table lists the number of bases each index pair should differ by and is based on the mismatch threshold to prevent an index collision:
| Mismatch Threshold | Number of Differences Required to Prevent Index Collision |
|---|---|
| 0 | ≥1 |
| 1 | ≥3 |
| 2 | ≥5 |
Example
A library pool with two samples is sequenced, and the Index 1 sequences are AAAA and AGAG. If the Index 1 Mismatch Threshold value is 1 and the observed Index 1 read is AAAG, then the index read matches the index sequences of both samples. The minimum requirement of a three base difference between the index sequences allows a read with a single index mismatch to still be assigned to a sample.
Read Orientation
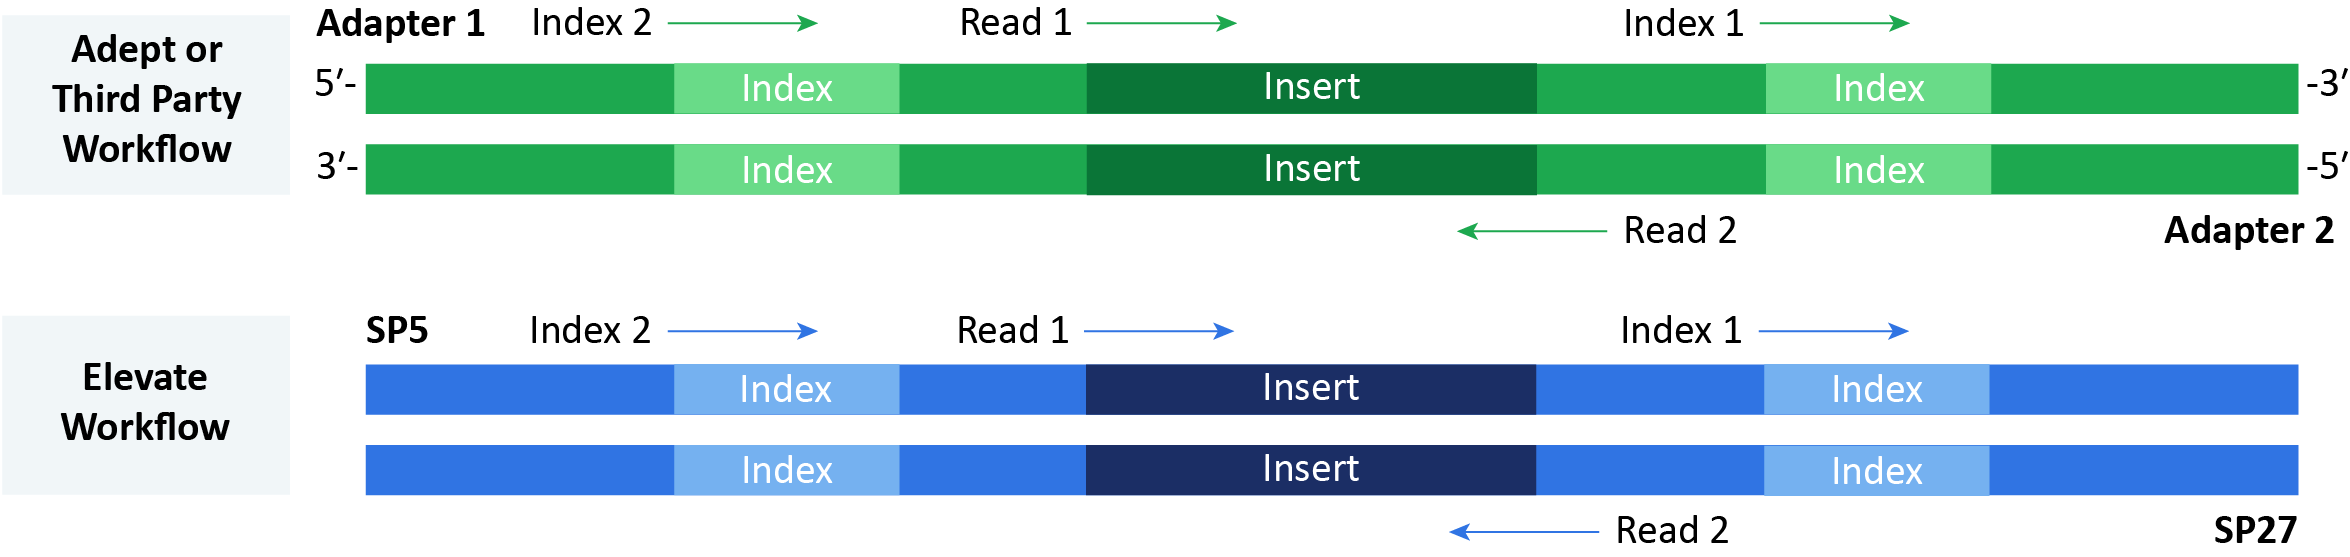
Since the Adept Workflow is based on on a third-party kit, an Adept library includes compatible adapters. In comparison, the Elevate Workflow uses Element Biosciences™ indexes and adapters to prepare libraries with SP5 and SP27 sides.
AVITI OS v2.0.0 or later sequences the library and the complementary sequence and includes any indexes. Index 1, Index 2, and Read 1 occur in order on the Adapter 1 or SP5 side. Then, the run performs Read 2 on the Adapter 2 or SP27 side.
Figure 2: Sequencing Adept and Elevate libraries
Custom Sample-Level Metadata
Custom columns are optional and can be added to the Wells section to specify additional key-value metadata for wells. Custom columns must meet the following requirements:
- Each custom column name is unique and includes case-sensitive variations.
- A custom column cannot have the same name as a required column.
- When a sample name is repeated, each corresponding value in the custom column must match exactly.
- The key character limit is 1–64. Valid characters include lowercase and uppercase letters, numbers, hyphens (-), and underscores (_).
- The value character limit is 0–255 ASCII characters.
Sample Specification Examples
The following examples show how to enter samples for specific use cases:
Using Individually Addressable Lanes with Projects
Use the Individually Addressable Lanes add-on with two library pools and associate samples with projects Library_Pool_1 or Library_Pool_2.
[Samples],,,
SampleName,Index1,Index2,Lane,Project
Sample_1,CCC,AAA,1,Library_Pool_1
Sample_2,TTT,GGG,1,Library_Pool_1
Sample_3,AAA,GGG,2,Library_Pool_2
Add Custom Sample-Level Metadata
Add a custom column, Custom_Metadata, with the value of Sample_1_metadata, Sample_2_metadata, and Sample_3_metadata for three distinct sample.
[Samples],,,
SampleName,Index1,Index2,Lane,Custom_Metadata
Sample_1,CCC,,1,Sample_1_metadata
Sample_2,TTT,,1,Sample_2_metadata
Sample_3,AAA,,1,Sample_3_metadata
Defining Index Sequences
Associate a sample named ID1 with the Index 1 sequences AAAA and TTTT. You can organize the index sequences within a single column and use a plus sign + to combine them. You can also list the index sequences in individual sample rows.
[Samples]
SampleName,Index1
ID1,AAAA+TTTT
[Samples]
SampleName,Index1
ID1,AAAA
ID1,TTTT
Associate a sample named ID1 to a combined Index 1 and Index 2 sequence, AAAATTTT.
[Samples]
SampleName,Index1,Index2
ID1,AAAA,TTTT
Associate a sample named ID1 to the combined Index 1 and Index 2 sequences AAAATTTT and CCCCGGGG.
[Samples]
SampleName,Index1,Index2
ID1,AAAA,TTTT
ID1,CCCC,GGGG
Associate a sample named ID1 to the combined Index 1 and Index 2 sequences AAAATTTT, AAAAGGGG, CCCCTTTT, and CCCCGGGG.
[Samples]
SampleName,Index1,Index2
ID1,AAAA+CCCC,TTTT+GGGG
Reconciling Different Index Sequence Lengths
If the index sequences for samples in a run manifest do not have the same length, then use one of the following approaches to reconcile the difference:
Use a single run manifest and append the first nucleotides of the adapter read next in sequencing to the end of shorter index sequences. This addition allows the shorter index sequences to match the length of the longest index sequence.
Use two run manifests with different index sequence lengths, and execute Bases2Fastq twice. Make sure that you update any impacted settings, such as base masks.
The following examples demonstrate these approaches for a scenario with two samples with different index sequence lengths. Sample1 uses 8 bp index sequences and Sample2 uses 10 bp index sequences. The run manifest contains sequences for R1Adapter and R2Adapter, and the sequencing run uses the outer primer 5' AGATCGGAAGAGCACACGTCTGAACTCCAGTCA 3'.
[Settings]
R1Adapter, CGTGCTGGATTGGCTCACCAGACACCTTCCGACAT
R2Adapter, AGTTGACAAGCGGTAGCCTGCACACCTTCCGACAT
[Samples]
SampleName,Index1,Index2
Sample1,AGGCAGAA,TGCTACGA
Sample2,CGTTCTCTTG,CACCAAGTGG
Use a Single Run Manifest
To use a single run manifest for this scenario, update the run manifest index sequences as follows:
Append the first two nucleotides of the outer primer (
AG) to the end of theIndex1sequence forSample1.Append the first two nucleotides of the
R1Adapter(CG) to the end of theIndex2sequence forSample1.[Settings]
R1Adapter, CGTGCTGGATTGGCTCACCAGACACCTTCCGACAT
R2Adapter, AGTTGACAAGCGGTAGCCTGCACACCTTCCGACAT
[Samples]
SampleName,Index1,Index2
Sample1,AGGCAGAAAG,TGCTACGACG
Sample2,CGTTCTCTTG,CACCAAGTGG
Use Two Run Manifests
The following example run manifests show the same samples and index sequences in two run manifests:
Run Manifest Acontains the 8 bp index sequences forSample1.Run Manifest Bcontains the 10 bp index sequences forSample2.Run Manifest A, Sample 1 (8 bp)[Settings]
R1Adapter, CGTGCTGGATTGGCTCACCAGACACCTTCCGACAT
R2Adapter, AGTTGACAAGCGGTAGCCTGCACACCTTCCGACAT
I1Mask, I1:Y8N*
I2Mask, I2:Y8N*
[Samples]
SampleName,Index1,Index2
Sample1,AGGCAGAA,TGCTACGARun Manifest B, Sample 2 (10 bp)[Settings]
R1Adapter, CGTGCTGGATTGGCTCACCAGACACCTTCCGACAT
R2Adapter, AGTTGACAAGCGGTAGCCTGCACACCTTCCGACAT
I1Mask, I1:Y10N*
I2Mask, I2:Y10N*
[Samples]
SampleName,Index1,Index2
Sample2,CGTTCTCTTG,CACCAAGTGG